Learn Solidworks Basic Part Modeling
Free Download Learn Solidworks Basic Part Modeling
Published 5/2024
MP4 | Video: h264, 1280x720 | Audio: AAC, 44.1 KHz, 2 Ch
Language: English | Duration: 51m | Size: 475 MB
Junior Draughtsman
What you'll learn
Basic Part Modeling
3-D Features
Patterns
Sketch
Assembly (Mate)
Requirements
Technical Understanding of Technical Drawing
Description
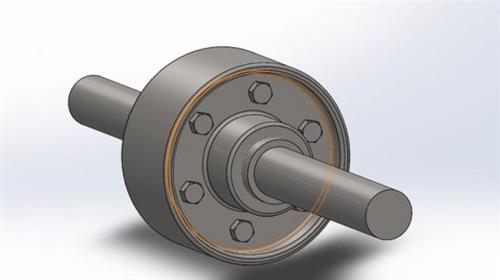
Drafting a flange coupling with SolidWorks can be an enriching experience. Here's a simplified step-by-step guide to help you get started:Open SolidWorks: Launch SolidWorks and create a new part file to begin your design.Sketch the Flange: Use the sketch tools to create the profile of your flange coupling. This typically involves drawing circles for the bolt holes and a larger circle for the outer diameter of the flange. Make sure to dimension your sketch appropriately for accuracy.Extrude the Sketch: Once your sketch is complete, use the Extrude feature to give your sketch depth and turn it into a 3D object. Specify the desired thickness for your flange.Add Bolt Holes: Create sketches for the bolt holes on the flange. These are typically evenly spaced around the circumference of the flange. Ensure they are properly dimensioned and aligned.Create the Shaft: Switch to a new sketch and draw the profile of the shaft that will connect to the flange coupling. This might be a simple circle or a more complex shape depending on your design requirements.Extrude the Shaft: Similar to the flange, use the Extrude feature to give depth to your shaft sketch and turn it into a 3D object. Make sure the length matches the desired dimensions.Combine Flange and Shaft: Utilize SolidWorks' assembly features to combine the flange and shaft into a single assembly. This involves positioning the flange and shaft correctly relative to each other.Add Detailing: Fine-tune your design by adding any additional features or details necessary for your flange coupling, such as chamfers, fillets, or text annotations.Review and Finalize: Take a moment to review your design, ensuring all dimensions are accurate and features are correctly positioned. Make any necessary adjustments.Save and Document: Once satisfied with your design, save your SolidWorks file and consider creating detailed documentation or drawings to accompany your design for future reference.Remember, this is a simplified guide, and there may be variations or additional steps depending on your specific design requirements. SolidWorks offers a plethora of tools and features to explore, so don't hesitate to experiment and learn as you go
Who this course is for
Solidworks Beginner
Homepage
https://www.udemy.com/course/learn-solidworks-basic-part-modeling/Rapidgator
iqzcu.Learn.Solidworks.Basic.Part.Modeling.rar.html
Fikper Free Links
iqzcu.Learn.Solidworks.Basic.Part.Modeling.rar.html
No Password - Links are Interchangeable